
 Reserve with Google
One of your clients – let’s call her Jane – just booked an appointment. Jane has been eyeing the services on your website for some time, so you implemented a marketing campaign to target her with specific messages. She finally booked an appointment and showed up.
So, now you can sit back and relax, right?
Well, not quite.
Businesses, and especially appointment-based businesses like salons, medical spas, dog groomers and so on, need to implement a few extra steps via their scheduler software to officially close the sale.
These steps will increase client retention by ensuring Jane visits you again (i.e. by setting up automatic rebooking reminders and product sales). Further, officially closing the sale is necessary for your clients to actually review your services.
Above all, you can’t forget about Jane once she has received your service. You need to officially close the sale by doing three things:
-
- Asking for a rebooking appointment
-
- Asking for a product sale (or membership)
- Asking for a customer review
Here is how to do each of these steps using Yocale.
Asking For A Rebooking Appointment
Once a client has booked an appointment, you want to do everything in your power to ensure that that client visits you again – and preferably sooner than later.
Remember – loyal customers are the most profitable. As we’ve said before on the blog, loyal customers not only spend 67% more over time, but they also generate more referrals for your business as well.
When Jane visits you again, she is much more likely to see the benefits of those services and treatments.
The great thing about scheduler software is that it is designed to make the rebooking process an easy one.
Yocale, for instance, allows you to set up automatic rebooking reminders. This feature allows businesses to automatically send gentle reminders to their clients that it’s time to come back for another visit.
In fact, automatic booking reminders are the fastest way to generate both recurring revenue and customer loyalty.
Yocale’s rebooking reminders are very much like those old reminder cards you might get from your dentist to remind you to come back to the dentist in 6 months (the ones that you would put on your fridge). But everyone knows that those cards never stayed on the fridge for long.
With scheduler software and Yocale’s automatic rebooking reminders, you can set up rebooking reminders so that they send out a reminder automatically (therein saving your staff a lot of time and effort) while ensuring that they never get lost along the way.
Here is how to set up automatic rebooking reminders in Yocale:
Now, before we show you how to set up automatic rebooking reminders, you need to know two things: first, automated rebooking reminders are called Interactions. Second, they are managed in the Client Files.
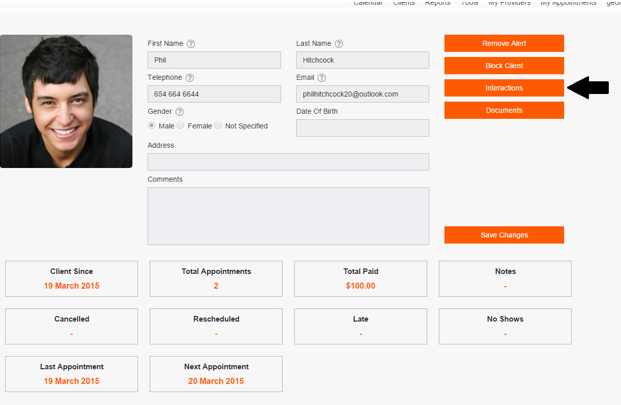
Step 1: Go to your Client’s details page. Click ‘Interactions.’
Step 2: You will then see a page that looks like this:
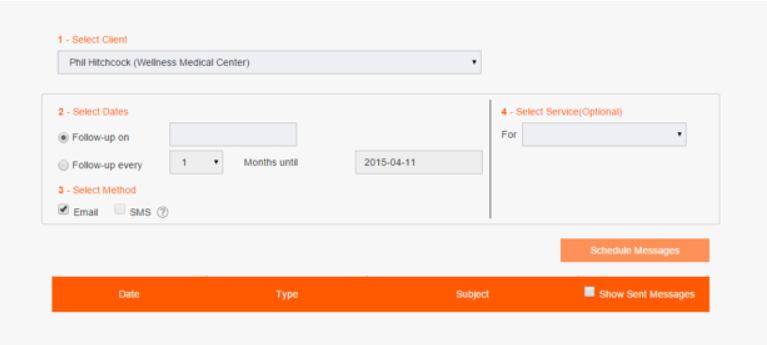
Select your client, dates and method.
For dates, you have the option to choose a single follow-up appointment or multiple periodic follow-up appointments.
Then, click ‘Schedule Messages.’
Here are some extra tips to rebook clients.
Asking For Product Sales
If appointment-based businesses want to generate customer loyalty, they should also encourage their clients to try additional services, to sign up for a membership, to purchase a package and so on.
Again, clients will be more likely to see the benefits of your services when they visit you regularly.
With this in mind, Yocale users can add any of the above options to their clients’ invoices with the following steps:
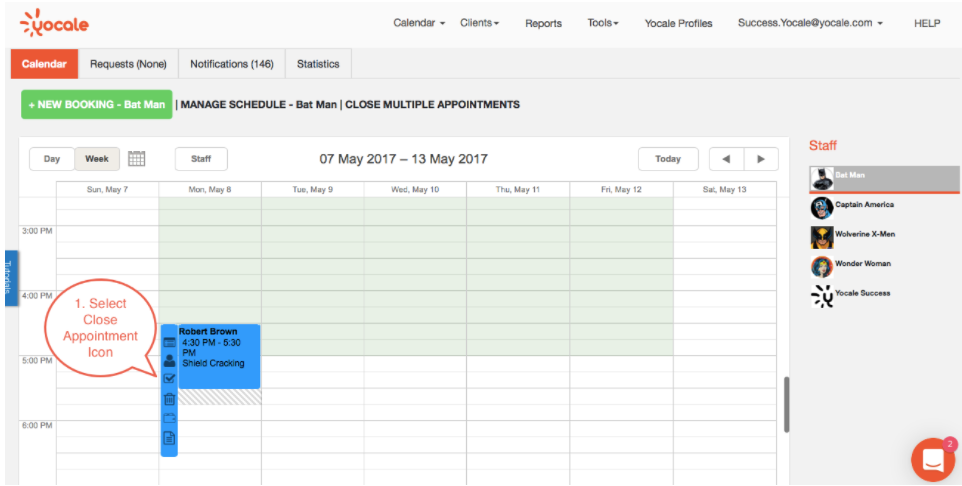
Step 1: Click on your appointment in your calendar. Next, select ‘Close Appointment.’

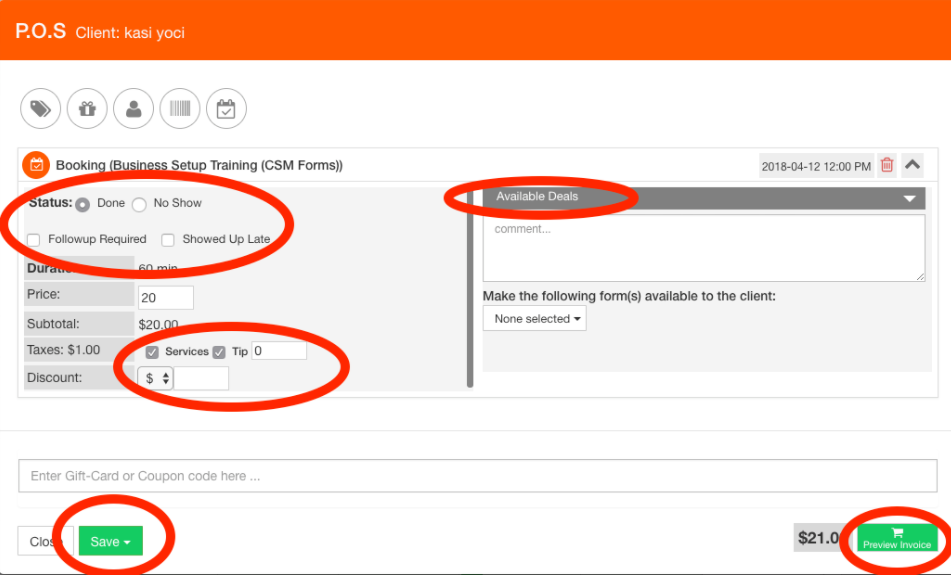
Step 2: Next to Status, you can select ‘Done’ (you can also select ‘No show’ if the client did not show up).
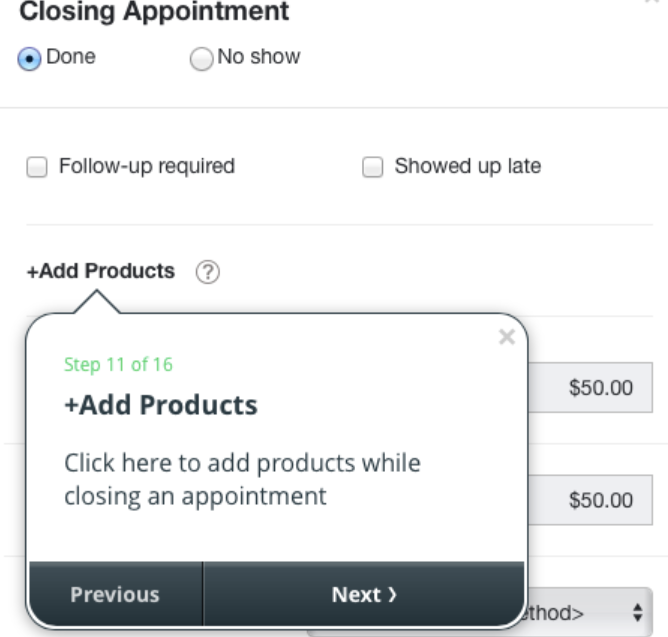
Step 3: Complete all other details regarding the appointment. If you want to add products, simply click ‘+Add Products.’
Go ahead and fill out any other the relevant details, like product type, quantity and so on. For further step-by-step instruction on how to sell products with your appointment, visit our help center.
You can also add memberships, packages, gift cards or additional services to each appointment.
Step 4: Complete all of the remaining fields (such as cost, taxes and so on).
Step 5: Select ‘Preview Invoice’ to select the invoice and payment method.
Step 6: Click ‘Save.’
Collecting Customer Reviews
Reviews are critical to business success. Indeed, research shows that reviews such as testimonials can increase conversions by as much as 34%. Simply put, reviews establish you as trustworthy.
Again, scheduler software like Yocale is designed to automate this process so that businesses like yours can focus on other areas of your business.
However, in order to have your client review your service, you need to actually close that booking first. This means that you have to mark the appointment as “Done.” As you will see, marking the appointment as ‘Done’ follows the same step as detailed in #2 above.
Closing the appointment essentially tells the system to send out an email to leave the review (as well as view their receipt). However, this step is also put in place to protect your business against negative and false reviews, whether from competitors, unsolicited hackers and so on and so forth.
Simply put, Yocale makes users mark their appointment as ‘Done’ in order to protect both your clients from misleading reviews and to protect businesses’ images as well.
But how does this process work?
Once the appointment is marked ‘Done,’ an electronic receipt is sent to the client. At the bottom of the receipt, the client will find a kind message that asks for a quick review. Clients will find a direct link that takes them to Yocale’s review system.
Clients can click on the link and then leave a star rated review along with comments if they so choose. Reviews are for the service provider that they just had the service with.
Also note that even if the client isn’t ready to leave a review at that exact moment, they can do so at any time as long as their appointment is marked as ‘Done.’
Also note that even if you have not enabled automatic receipts (although we do not recommend this), your clients will still receive an email that asks them “How was your appointment?”
Here is how to close appointments in Yocale:
You can find a tutorial on this here:
http://https://www.youtube.com/watch?v=rm0RYTCTBZM
Step 1: Click on your appointment in your calendar. Next, select ‘Close Appointment.’

For more information, our help center will also show you how to close appointments.
Step 2: Next to Status, you can select ‘Done’ (you can also select ‘No show’ if the client did not show up).
Step 3: Complete all other details regarding the appointment.
Step 4: Click ‘Save.’
Here are 3 ways to collect more online customer reviews.
Wrapping It Up
Even though your client may have shown up for their booking and your service was successful, the booking process is still not complete.
Appointment-based businesses need to officially close the sale by asking for a rebooking reminder and a product sale (or memberships). With Yocale, closing the sale by marking appointments as ‘Done’ will also enable the system to automatically send out reviews.
Above all, taking the time to close the sale will increase client retention rates, generate recurring revenue and lead to more business growth as a result.
*
Do you want more exposure and appointment bookings for your business? Yocale is home to the best scheduler software on the market. With our beautiful and easy-to-use calendar, we give you the extra hand you need to run and grow your business at the same time. Click here to sign up for FREE or learn more.